When your brick walls start showing signs of wear, tuckpointing might be the solution you need. Crumbling mortar doesn’t just look bad—it can compromise your building’s structural integrity. Understanding the tuckpointing process can help you protect your investment and restore your masonry’s strength and appearance. But how exactly does this specialized repair technique work, and what makes it so essential for maintaining your property’s resilience? Stay tuned to discover the strategic steps that can transform deteriorating joints into solid, visually appealing surfaces.
Assessing Mortar Damage and Joint Deterioration
The first step in tuckpointing is carefully evaluating the condition of your masonry’s mortar joints, which can reveal critical understandings about potential structural vulnerabilities. You’ll want to closely examine the structural integrity of your brickwork, checking for signs of wear, cracking, or erosion. By evaluating brick condition with great care, you’ll identify areas requiring immediate attention. Wind and moisture damage can significantly accelerate mortar deterioration, making early detection crucial for preventing extensive structural problems.
Weathering, water damage, and age can compromise mortar joints, potentially leading to more significant structural issues. Professional assessment helps you catch problems early, preventing costly repairs and maintaining your building’s strength and appearance.
Selecting the Right Tools and Materials
When undertaking a tuckpointing project, you’ll need to carefully select specialized tools and materials that match your specific masonry repair requirements. Matching mortar composition is vital for ensuring a seamless repair that blends with existing brickwork.
You’ll want to evaluate tool options like precision grinding tools, specialized trowels, and mortar mixing equipment that can handle your specific job’s demands. Choosing high-quality materials and understanding their compatibility with your existing structure will help you achieve professional-looking results that restore your masonry’s integrity and aesthetic appeal. Exterior brick masonry services in Pittsburgh offer expert restoration techniques that can guide homeowners through complex repair processes.
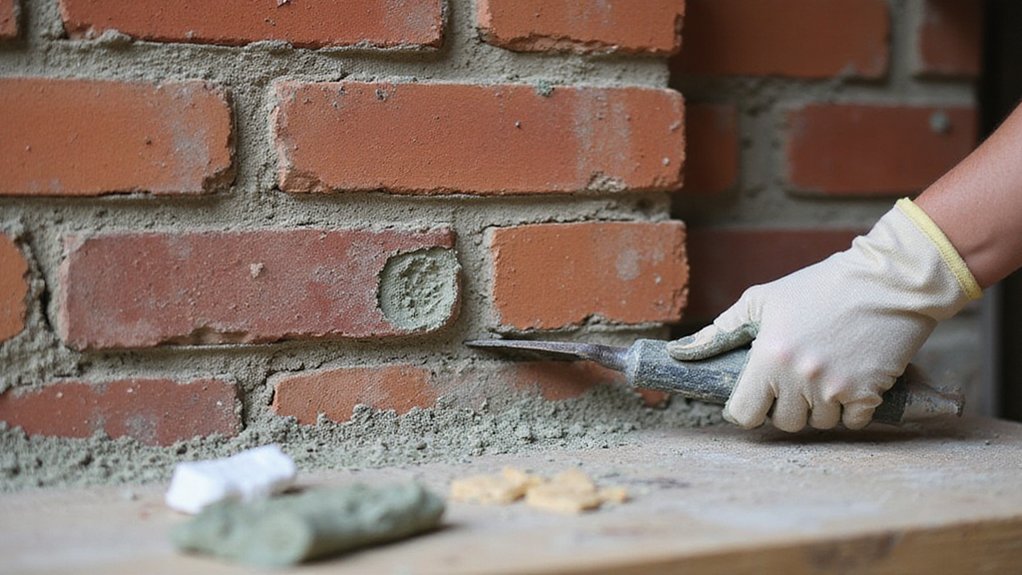
Removing Old Mortar Safely and Effectively
Because mortar deterioration can compromise your brick structure’s stability, you’ll want to approach removal with precision and care. Proper masonry cleaning techniques are essential for successful tuckpointing.
Here’s how you’ll safely remove old mortar:
- Wear protective gear like safety glasses and dust masks
- Use specialized grinding tools with diamond-tipped blades
- Remove mortar to a consistent depth of ½ to ¾ inches
- Work systematically, ensuring even and controlled removal
Mortar removal safety precautions protect both you and your structure. By following these guidelines, you’ll prepare your masonry for expert restoration, maintaining its structural integrity and aesthetic appeal.
Preparing the Surface for New Mortar
After carefully removing old mortar, you’ll want to diligently clean and prepare the surface for new mortar installation. Proper surface preparation is pivotal for a successful tuckpointing project.
You’ll need to thoroughly inspect the area, removing any loose debris, dust, or remaining mortar fragments. Use a wire brush or specialized cleaning tool to guarantee a clean, smooth surface that’ll help the new mortar adhere properly.
Take your time during this step, as a well-prepared surface is the foundation for a durable and aesthetically pleasing repair that’ll safeguard your masonry structure for years to come.
Mixing the Perfect Tuckpointing Mortar
Preparing the right mortar mix is a critical step that can make or break your tuckpointing project. You’ll want to nail this process to guarantee a professional finish.
- Measure dry ingredients precisely
- Control water-to-cement ratio carefully
- Mix thoroughly to achieve consistent texture
- Test mortar’s workability before application
Achieving proper mortar consistency requires patience and practice. You’ll need to balance moisture and ingredients to create a mix that’s neither too dry nor too runny. Your attention to detail will determine the quality of your tuckpointing work, so take your time and mix with care.
Applying Mortar With Precision Techniques
Once you’ve perfected your mortar mix, the precision of its application becomes the true test of tuckpointing skill. You’ll want to apply mortar efficiently, using a specialized tuckpointing trowel that allows for controlled, even distribution.
Start by carefully filling the joint, ensuring you’re achieving consistent depth throughout the masonry surface. Work methodically, pressing the mortar firmly but gently into the designated spaces. Your technique matters: angle the trowel at a consistent 45-degree approach, and maintain steady hand pressure to create clean, uniform lines that will bolster the structural integrity and aesthetic appeal of the wall.
Creating Clean and Attractive Mortar Lines
How can you redesign ordinary mortar joints into visually stunning structural elements? Tuckpointing transforms mundane walls into designer masterpieces through strategic color coordination and precision techniques.
Consider these key steps to create aesthetic appeal:
- Select complementary mortar and brick colors
- Use narrow, thin-lined tools for crisp edges
- Carefully remove old, damaged mortar joints
- Apply fresh mortar with consistent, clean technique
Your attention to detail will boost the visual quality of masonry work. By investing time in creating clean, attractive mortar lines, you’ll enhance the overall appearance and structural integrity of your project, turning ordinary surfaces into remarkable architectural statements.
Final Cleaning and Long-Term Maintenance
After constructing precise mortar lines, you’ll want to protect your masonry investment through strategic cleaning and maintenance. Begin by gently cleaning your newly tuckpointed surface with a soft brush and mild detergent, removing any residual debris without damaging the fresh mortar.
Sealing exposed surfaces will help prevent water penetration and future deterioration. You’ll need to perform periodic inspections, checking for potential cracks or signs of wear at least twice a year. Regular maintenance can extend the life of your masonry and maintain its aesthetic appeal, ensuring your investment remains both beautiful and structurally sound.
Frequently Asked Questions
How Long Does the Entire Tuckpointing Process Typically Take?
You’ll find that project timeline considerations vary, but typical tuckpointing duration ranges from 2-5 days for smaller jobs and 1-2 weeks for larger restoration projects, depending on your wall’s condition.
Can Homeowners Do Tuckpointing Themselves or Hire Professionals?
While you can attempt DIY tuckpointing, professionals offer significant advantages. Complex techniques and specialized tools make expert services more reliable, ensuring your home’s masonry remains structurally sound and visually appealing.
What Is the Average Cost of a Tuckpointing Project?
You’ll find tuckpointing project costs range from $500 to $2,500, depending on your home’s size and damage. Budget considerations and estimates vary, so get multiple professional quotes to match your specific needs.
How Often Should Masonry Walls Be Tuckpointed?
You’ll want to tuckpoint every 20-30 years, but watch for signs of deterioration. Regular masonry inspections every 3-5 years help catch potential issues before they become costly repairs.
Does Tuckpointing Improve a Building’s Structural Integrity and Value?
You’ll elevate your property’s structural integrity and value through tuckpointing. It reinforces walls, prevents moisture damage, and amplifies curb appeal, making your home more appealing to potential buyers and increasing its market worth.