Brick steps can quickly deteriorate, turning your home’s entrance from welcoming to worn. Crumbling mortar, loose bricks, and structural damage aren’t just eyesores—they’re safety hazards that can worsen if left unchecked. Whether you’re a DIY enthusiast or a homeowner concerned about maintenance, understanding how to restore your brick steps is pivotal. The good news? With the right approach, you can bring your steps back to life. Want to learn how to tackle this repair and prevent future damage?
Assessing the Damage to Your Brick Steps
If your brick steps are showing signs of wear and deterioration, it’s imperative to undertake a thorough damage assessment before beginning repairs. You’ll want to carefully inspect each brick and mortar joint, identifying deterioration patterns that could compromise your steps’ structural integrity. Mortar joint damage can be particularly critical, as wind and moisture progressively weaken the structural bonds between bricks. Check for crumbling edges, loose bricks, and cracks that might indicate deeper problems. By systematically evaluating the underlying structure, you can determine whether surface repairs will suffice or if more extensive restoration is necessary. Don’t ignore small signs of damage, as they can quickly escalate into significant structural issues that are costlier to fix.
Essential Tools and Materials for Brick Step Repair
After carefully evaluating the damage to your brick steps, you’ll want to gather the right tools and materials to tackle the repair effectively. You’ll need a sturdy trowel, masonry chisel, safety glasses, work gloves, and a hammer. Proper brick selection is essential, so choose matching replacement bricks that complement your existing steps. Ensure you have quality mortar mix, sand, and a mixing bucket. Appropriate weather preparation means selecting a dry, moderate temperature day for repairs. Having the right tools and materials will make your brick step restoration project smoother and more successful. In Pittsburgh, professionals recommend comprehensive foundation repair to address potential underlying structural issues that might affect your brick steps.
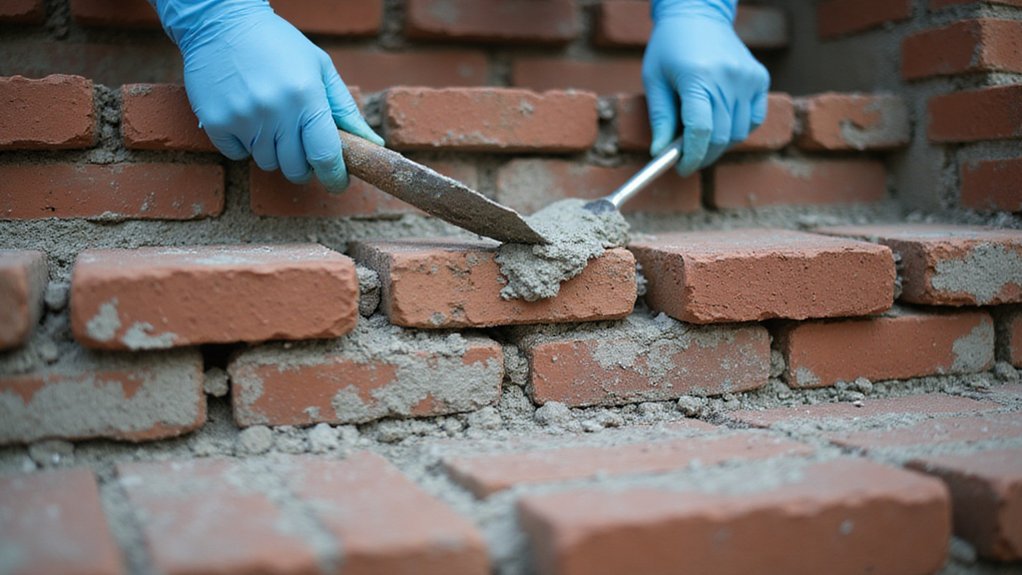
Removing Damaged Mortar and Preparing Surfaces
When tackling brick step restoration, carefully removing damaged mortar is a critical first step in ensuring a solid, long-lasting repair. You’ll want to thoroughly inspect mortar condition, looking for cracks, crumbling, and signs of water damage. Identifying root causes helps prevent future deterioration.
Use a masonry chisel and hammer to gently remove loose or compromised mortar, being careful not to damage surrounding bricks. Work methodically, removing material to a depth of about half an inch. Clean out debris with a wire brush, creating a clean surface for new mortar application. Safety glasses and work gloves are essential during this process.
Step-by-Step Mortar Replacement Techniques
The art of mortar replacement requires precision and patience, altering crumbling brick steps into sturdy, reliable structures. You’ll want to mix your mortar carefully, following manufacturer instructions for the right consistency and strength.
Be mindful of curing time considerations, allowing each layer to set properly before proceeding. Work methodically, removing old mortar with a chisel and cleaning joints thoroughly. Apply new mortar using a pointing trowel, pressing it firmly into gaps and smoothing surfaces.
Take your time and pay attention to detail, ensuring each joint is filled completely and evenly for a professional-looking repair.
Replacing Broken or Loose Bricks
Should bricks in your steps appear cracked, chipped, or wobbly, you’ll need a systematic approach to replacement that guarantees structural integrity and aesthetic appeal. Start by carefully removing damaged bricks using a chisel and hammer, taking care not to damage surrounding masonry.
Clean the area thoroughly, removing old mortar and debris. When reinstating missing bricks, confirm they match the existing ones in size and color. Repointing deteriorating mortar requires precision and proper technique. Apply new mortar carefully, filling gaps completely and creating a smooth, even surface that’ll restore your steps’ strength and beauty.
Sealing and Waterproofing Your Repaired Steps
Why risk water damage after carefully repairing your brick steps? Protect your hard work by applying sealants and waterproofing membranes that’ll shield your steps from moisture intrusion. Consider these pivotal protection methods:
- Silane/siloxane penetrating sealers that invisibly guard against water absorption
- Breathable masonry waterproofing membranes that create an invisible protective barrier
- Clear acrylic sealants that repel water while maintaining your steps’ natural appearance
Your newly restored brick steps deserve extensive protection. By investing in quality waterproofing, you’ll prevent future deterioration, extend the life of your masonry, and maintain your home’s aesthetic appeal. Don’t let water compromise your repair efforts.
Common Mistakes to Avoid During Brick Step Restoration
While brick step restoration can seem straightforward, homeowners often stumble into costly errors that compromise their repair project’s success. Incorrect mortar application can weaken your steps’ structural integrity, leading to further damage. You’ll want to avoid using the wrong mortar mix or applying it unevenly, which can cause future cracking and deterioration.
Improper brick laying techniques can create unstable surfaces that won’t withstand weather and foot traffic. Be sure to align bricks precisely, maintain consistent mortar joints, and guarantee proper drainage to prevent water retention. Taking your time and following best practices will help you achieve professional-looking, durable brick steps.
When to Call a Professional Masonry Contractor
Brick step restoration can quickly become overwhelming, especially when complex damage requires specialized knowledge. You’ll want to call a professional masonry contractor when facing these critical situations:
- Significant structural cracks indicating potential foundation issues
- Widespread mortar deterioration beyond simple patch repairs
- Safety considerations involving unstable or severely compromised brick steps
When signs of severe damage appear—like deep fissures, extensive crumbling, or uneven surfaces—DIY repairs might worsen the problem. Professionals possess the proficiency to diagnose underlying issues, recommend appropriate solutions, and guarantee your steps are both aesthetically pleasing and structurally sound. Their specialized abilities can save you time, money, and potential future headaches.
Frequently Asked Questions
How Long Will My Repaired Brick Steps Last After Restoration?
Your restored brick steps can last 25-50 years, depending on maintenance quality, weather exposure, and repair techniques. Proper sealing and regular inspections will help you maximize their expected lifespan.
Can I Repair Brick Steps During Rainy or Cold Weather?
You’ll want to avoid repairing brick steps during rainy or cold weather, as moisture concerns and temperature impacts can compromise your repair’s integrity and bonding strength.
What’s the Typical Cost Range for DIY Brick Step Repairs?
You’ll spend $50-$300 on materials, depending on damage extent. Your DIY labor investment ranges from 4-8 hours, saving significant money compared to professional repair costs for brick step restoration.
Are There Eco-Friendly Alternatives to Traditional Mortar and Repair Materials?
You’ll find eco-friendly alternatives like limestone-based natural materials and plant-derived sustainable sealants that’ll help repair brick steps while reducing environmental impact and connecting you to greener home maintenance practices.
How Can I Prevent Future Damage to My Brick Steps?
You’ll protect your brick steps by implementing regular brick cleaning techniques and following a seasonal maintenance schedule. Seal cracks promptly, remove debris, and inspect annually to prevent water damage and structural deterioration.